 |
Moog Concertmate MG-1 |
 |
Moog Concertmate MG-1 |
|
FREE plans to add MIDI
capability to the
|
 |
The following plans describe a method of adding MIDI capability to the
popular and affordable Moog Realistic Concertmate MG-1 analog synthesizer
with the Synhouse MIDIJACK. The MG-1 is especially well suited for
this modification due to the tiny size of the MIDIJACK circuit board and
the fact that it is the first analog MIDI retrofit ever made that costs
less than the instrument itself! The original factory keyboard glide
in the modulation section will still work with MIDI. Some drilling
is required to do the cleanest possible installation, unless the
user prefers to mount the DIN jack to the plastic sides of the instrument.
There is plenty of space on the MG-1 to mount the MIDIJACK with the provided
hardware. The micro size and black color of the MIDI button are such
a perfect match for the MG-1 that it makes it look as if it came from the
factory with the MIDI interface. The installation of the MIDIJACK
in an MG-1 is one of the easiest modifications of all. In fact,
with the MIDIJACK, it is possible to convert the MG-1 to MIDI without
even removing a single circuit board from the instrument! The correct
analog I/O signals are easy to find and connect to the MIDIJACK.
Like many older American synthesizers, the MG-1 has panel-mounted
CV/S-trigger jacks (referred to as "pitch" and "trigger" ports on the MG-1)
with solder terminals and the MIDIJACK wires can simply be soldered right
at the inside of the panel and the whole MIDI conversion job can be done
in 20 minutes. The 1/4" jacks do not even need to be unscrewed from
the back panel. They may be left in place and soldered right on the
spot. This modification reroutes the local keyboard signals through
the computer-controlled analog switching matrix of the MIDIJACK by extracting
the signal and inserting the users' choice of local keyboard control or
MIDI. You can do this yourself if you have a little experience with
electronic repair and the soldering of wires and circuit boards.
If not, these plans may assist a professional repair shop installing
the MIDIJACK for you. It is best to download these notes and photos
and print them out on paper to look at while working on the instrument
and make notes and check off the steps as you go. As with any project,
it is best to completely read and understand each step of the instructions
before starting. All repairs and modifications made to your instruments
will be done at your own risk and Synhouse Multimedia Corporation assumes
no liability for personal injury caused or damage to equipment or loss
of use caused directly or indirectly by the use of these plans. If
in doubt, don't do it!
Instructions:
1) Be sure to have the correct tools and supplies for for the job. If you do not have them, get them. You will need a regular size Phillips screwdriver, a smaller size Phillips screwdriver, needlenose pliers, wire cutters or other flush cut nippers, a hobby knife such as an X-Acto, scissors, a soldering iron, solder, electrical insulating tape, and a black Sharpie permanent ink marking pen. If you intend to mount the DIN jack on the back panel with the rest of the interface ports (highly recommended), you will need to use a chassis punch (a small hand tool that safely cuts a clean hole in a metal panel) to make the hole for the DIN jack, and an electric drill with a 3/32" or similar size drill bit to drill holes for the 4-40 hardware used to mount the DIN jack, and also a 1/4" or 5/16" drill bit to make a pilot hole to start the chassis punch. The correct size for mounting a MIDI DIN jack is 14.5 mm metric or 5/8" SAE (.62"/15.9 mm) in American sizes. A chassis punch may be purchased from any good tool or hardware store. If it is more convenient, a punch may be mail ordered via internet or telephone from Mouser Electronics at http://www.mouser.com or (800) 346-6873. The Mouser part number is 586-3803 for the name-brand Greenlee 730-5/8 (about $30). The cheaper house brand part number is 380-0145 (less than $20). The service from Mouser is unpredictable and the house brand ordered by Synhouse for the test installation took three months to be delivered, while the Greenlee part was delivered in one week. Mouser refused to give even a small discount to customers of Synhouse, so no recommendation is deserved or being made here, and any other source you know of to buy this type of tool is highly recommended and certainly a better place to buy from for all of your needs now and in the future. You will also need an 11 mm wrench (for Greenlee) or 1/2" wrench (for the Mouser house brand punch) or adjustable wrench to turn the chassis punch while cutting the hole. If you choose to mount the DIN jack in the soft plastic portion of the MG-1 chassis, the X-Acto knife will carve out the hole quite easily, and will also make the holes for the screws as well, so no chassis punch, electric drill, or drill bits are needed for this alternate quick mounting method.
2) Fully test the Moog Realistic Concertmate MG-1 to be converted to MIDI. Be sure that all functions such as the envelope generator work and that the instrument plays in tune while playing along with a known well-tuned instrument such as a newer digital synthesizer or sampler keyboard. If it doesn't work properly without MIDI, it certainly won't work with it.
3) Extreme caution should be taken while working on the Moog Realistic Concertmate MG-1. The unit should be unplugged while open and even then, the power supply may pose some electric shock hazard due to residual voltage in the power supply. Also note that the thin metal chassis has edges and corners that can be very sharp and rusty, so be careful not to cut yourself.
4) Remove the five Phillips screws that hold the upper and lower case halves together. Four are on the bottom panel, two on the right edge, two on the left, and one is on the rear panel at the lower edge in the center.
5) Open the case and
turn the synthesizer upside down and shake out any dust and debris that
may have accumulated inside the instrument over the years.
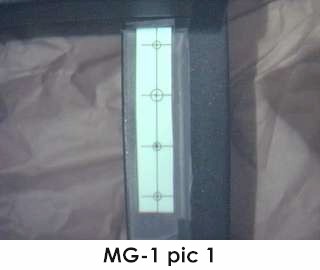
6) Determine the place
where the MIDIJACK circuit board will be mounted and test fit the board
into its' correct place inside the case. The best and safest place
to mount the MIDIJACK board is on the plastic panel to the right of the
keyboard, on the little flat ledge that is 1" x 5", with the
MIDI button towards the front and the scale adjust trimmer and the wires
at the rear. When put in this location, rather than on the
left side, all wires can be routed far away from the terminals of
the high voltage power transformer, fuse, and switch.
Mark the correct mounting holes on the panel with a pencil, marker,
or needle using the paper drilling template provided with the MIDIJACK
Installation Manual. The photo called MG-1 pic 1 shows the
paper drilling template in place. Do not use a high-speed drill to
make the holes. This portion of the panel of the MG-1 is made of
soft plastic and a high-speed drill will build up friction, generate
heat, and burn the plastic permanently. You may use a drill
set to a slow speed, or use a standard X-Acto knife blade with the
sharp point and twist it in place until it starts to dig a little hole.
When it gets close to reaching the other side, you can look inside
and see the tip coming through and dig back from the inside as well.
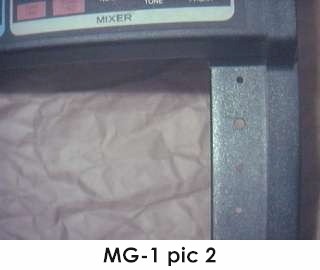
A perfectly round hole can be shaped using this technique. A photo
called MG-1 pic 2 shows the location of the newly cut mounting holes.
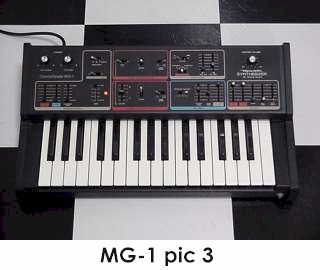
MG-1 pic 3 shows an overall view of the MG-1.
 |
7) Mount the MIDIJACK in place without fully tightening the screws and try to get the perfect size holes by twisting the X-Acto knife but do not make them too big. The switch should be fitted so well in the panel that the switch stem will not wiggle at all once in place. It should not have any free play but also should not be so tight that it binds. When the switch is pressed, it should have a definitive "click" and bounce back like the button on a new VCR. You will never regret spending too much time on this and good attention to detail will make the perfect MIDIJACK installation. The hole in the panel that is over the MIDIJACK scale adjust trimpot should be enlarged so a Synhouse Pocket Screwdriver can fit through the panel for periodic adjustment. The screws that secure the MIDIJACK board in place should be tightened very carefully. The panel is plastic so do not overtighten the screws. Such an installation will be nearly invisible, yet put the MIDI function button at the players' fingertips. For the serious Analog User and synthesizer collector, an ultra-clean installation pays off. |
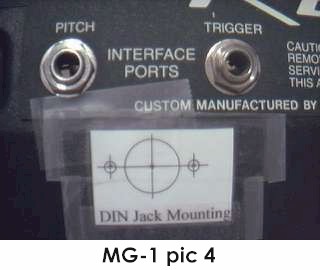
8) Determine the place
that the MIDI input DIN jack will be mounted. The perfect place is
on the rear jackpanel 1" below the pitch and trigger analog interface ports.
The way to make this look like original Moog factory equipment is to mount
the DIN jack inside the metal panel after marking the bare metal edges
of the hole with a black Sharpie permanent ink marking pen to match the
black finish of the original metal chassis. Use the paper template
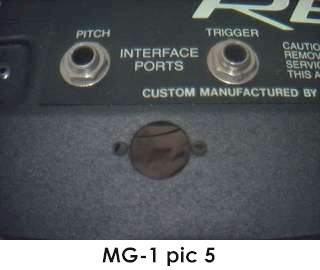
to mark the correct spots to drill and cut as shown in MG-1 pic 4.
It is advisable to use a chassis punch to make the hole for the DIN jack.
Remember that the DIN jack is to be mounted with the smaller 4-40 hardware
size rather than the larger 6-32 size that secures the main board.
Drill two holes for the screws then drill a slightly larger hole in the
center to act as a pilot hole for the chassis punch. Use the chassis
punch to cut the hole and be sure that the wrench is turning the tool from
inside the MG-1, not outside, so the cutting edge is coming
from the outside. This will ensure that the outer edge is perfectly
smooth. The properly cut mounting holes may be seen in MG-1 pic
5.
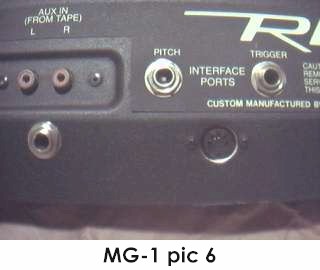 |
The MIDIJACK hardware packet contains both long and short 4-40 screws for the DIN jack. Use the two short ones for installation on a thin metal panel such as the MG-1. When all three holes are perfect, put the DIN jack in place inside the chassis and secure with the two screws from the outside, and the four split washers and two 4-40 nuts on the inside against the back of the DIN jack and tighten with a small Phillips screwdriver from the outside and the needlenose pliers from the inside. These should be very tight as they are going onto the metal surface of the DIN jack. If done cleanly and correctly, the MG-1 will look like it had MIDI when it came from the factory, as in MG-1 pic 6. |
| 9) The MIDIJACK #1 black and #2 red wires must be soldered in place to get the ground and power for the MIDIJACK. See the photo called MG-1 pic 7 which shows the easiest place to obtain the proper ground and power on the lower MG-1 circuit board which is below and behind the MG-1 keyboard. This may be done without having to remove any circuit boards from the instrument. There is a wire jumper near IC U1 that has the correct regulated +12v power. It is to the right side of the chip and marked in the photo. Solder the MIDIJACK #2 red wire to this point. If you have difficulty soldering the MIDIJACK wire to this jumper with normal rosin core electronic solder, use acid core solder for this connection. The ground is at the front end lead of resistor R7. This is the end facing the MG-1 keyboard. Solder the MIDIJACK #1 black wire to this point. An ultra-clean installer might prefer to cut all wires to the perfect length, but most users may prefer to save time by using the precut, stripped, and tinned wires at their standard lengths and there is no electrical reason not to. It is just a matter of preference and after the job is done and the MG-1 is put back into service, who will care? | 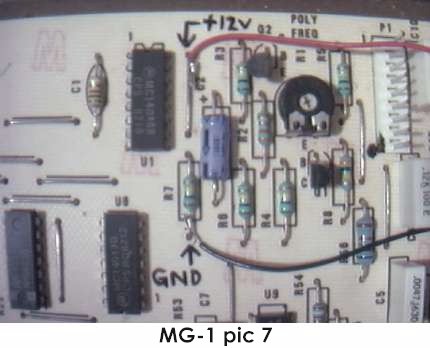 |
10) Locate the wire which is white with brown stripes at the back of the pitch (CV) jack. Remove the wire from the solder terminal by desoldering it. Solder the MIDIJACK #3 blue wire to the now-empty isolated CV terminal.
11) Solder the MIDIJACK #4 white wire to the now-disconnected white/brown wire. Carefully wrap the solder joint with electrical insulating tape.
12) Moog synthesizers generally do not disconnect the keyboard from the trigger circuit with a switched jack as they should. For this reason, the local keyboard will still trigger the envelope generator even with the MIDI activated. The MIDIJACK S-trigger wire must then be connnected in parallel with the existing trigger wire. A small signal diode can be inserted to isolate the signal so the local keyboard will still work when the MIDI is turned off. The correct type of diode is often included with the MIDIJACK in the accessory packet, but may also be purchased locally at any electronics store such as Radio Shack as a 1N914 or 1N4148 or equivalent type of switching diode. Locate the wire which is white with yellow stripes at the back of the trigger (S-trigger) jack. Leave it connected as it is and solder the anode end of the diode (the end AWAY from the little black band) to this point and solder the MIDIJACK #7 brown wire to the cathode end of the diode (the end with the little black band). In summary, the MIDIJACK #7 brown wire goes to the band end of the diode, the other end of the diode goes to the same terminal on the trigger jack that still has the white wire with yellow stripes soldered to it. There will now be a factory wire AND a diode connected to this terminal of the jack.
13) The MIDIJACK #5
yellow wire, #6 green wire, and #8 violet wire (unless it is
used for a special function) may be cut off at this time because they are
not needed for adding MIDI to the MG-1.
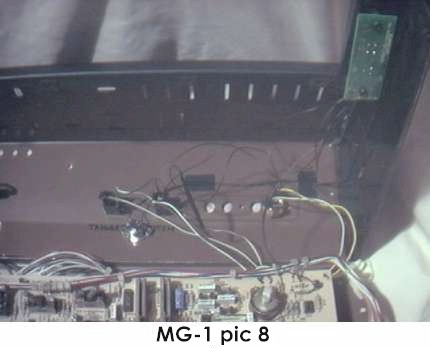
14) Now that all connections
have been made, the inside of the MG-1 should look as shown in MG-1
pic 8. It is a good idea to cut short pieces of electrical insulating
tape and use them to secure the MIDIJACK wires to the inside of the chassis
so they will not rattle and break loose inside the case once the instrument
is returned to service. The MIDIJACK hardware packet contains nylon
cable ties which can be used to tie the MIDIJACK wires to the original
MG-1 wire bundles.
Special note: This
photo shows the original audio output board removed. The original
MG-1 had a jack configuration which had RCA-type phono jack stereo in and
outs labeled on the rear jackpanel. The MG-1 is not stereo,
does not have any audio input, and the RCA jacks make it inconvenient
for use as a musical instrument. The board may be removed by drilling
out the rivets that hold it in place and installing a single 1/4" mono
jack of the same type used in an electric guitar. The way to do this
is to desolder and remove the wires going to the board and discard the
board containing the RCA jacks. The wire which is white with green
stripes is the ground and should be soldered to the terminal going to the
sleeve on the new 1/4" jack. The yellow wire is the synth sound output
and should be soldered to any ordinary 27K resistor and the other end of
the resistor soldered to the terminal going to the tip on the new 1/4"
jack. This will make for an audio output that is louder than stock.
Use a higher value resistor to make it lower volume, or a lower value
resistor to make it louder, but do not use a resistor below 10K as
it could damage equipment. The jack may be mounted in one of the
existing holes left by the removal of the original audio panel. At
the same time this is done, it may be useful and convenient to add
another jack of the same type to serve as an audio input to the filter.
To do this, solder a new wire to the terminal going to the sleeve
on the new 1/4" jack and the other end to the ground of the audio output
jack just described. Solder another new wire to the terminal going
to the tip on the new 1/4" jack and the other end of the wire to a 47K
resistor. The other end of the resistor should be soldered directly
onto the + positive end of capacitor C14 on the upper board between the
mixer tone one and tone two sliders. The + positive end is the one
pointing toward the rear of the instrument. The two open holes left
in the rear jackpanel should be covered with tape (or pieces of metal epoxy-glued
in place) to prevent dust contamination inside the instrument.
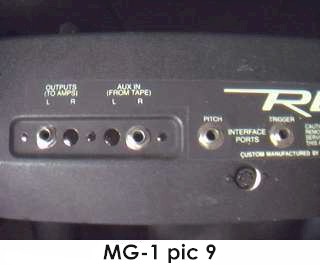
With this modification done, the MG-1 actually will have audio input
and output capability. Such an instrument can be seen in MG-1
pic 9.
15) Carefully examine
all soldered connections for possible short circuits before closing the
instrument.
16) Close chassis and secure with four screws on the bottom side and the one on the rear panel.
17) Test and calibrate using the procedures described in the MIDIJACK Quick Installation Manual.
18) This installation can be completed in 20-30 minutes. Extra time spent making a perfect installation or other improvements to the machine is time well spent. The MG-1, like many Moog synthesizers, used many poor quality components which have not held up over time. Not only do they deteriorate, but they can harm other parts of the instrument so it begins to self destruct. A good example of this is the "foam rubber" that was meant to keep dust from getting into the sliders, but instead put a chewy-gooey mess into them as the control panel backing reverted to its natural state as liquid chemicals. You may choose to take this opportunity to pull out the top board and clean the board and the back of the panel, but be warned: This is a very messy job that can ruin clothing, furniture, and by itself will take far more time than converting the MG-1 to MIDI with the Synhouse MIDIJACK.
19) When using MIDI
for control of the analog synthesizer voice, the built-in polyphonic
organ sound still works as it always did by local control and is not affected
by the MIDI input or the pitch and trigger (CV/S-trigger) jacks.
The single and multiple note triggering modes supported by the MIDIJACK
do not have any effect on the original Moog-style single note triggering
on the MG-1. The MIDIJACK MIDI button will activate or deactivate
MIDI operation, allowing full MIDI control of the analog VCOs,
VCF, and envelope generator, but will not interfere with the
local keyboard triggering of the envelope generator or control of the polyphonic
organ sound. It is impossible to bypass the keyboard completely so
it is probably a good idea not to play the local MG-1 keyboard while MIDI
is in use or vice versa.
Copyright © 2000 Synhouse Multimedia Corporation